라라벨 공부
개요
해당 이미지 업로드 포스트는 이전 포스트가 존재합니다, 아래 글부터 봐주시기 바랍니다.
Laravel9 이미지 업로드 (with Dropzone) 1부 : Setting & Create & Image Upload
라라벨 공부 바로가기 개요 우리가 만들 사이트는 Dropzone.js를 이용해 Drag & Drop으로 이미지를 저장할 수 있는 일종의 미디어 라이브러리를 만들고자 합니다, Dropzone.js를 쓰지 않는 이미지 업로드
seung.tistory.com
1. Index
이제 이미지도 저장했고 DB에 데이터도 저장했습니다.
저장한 데이터를 뿌려주도록 합시다
web.php에 아래 코드를 추가해주도록 합시다.
Route::get('/', [ImageController::class, 'index'])->name('image.index');컨트롤러도 수정해줍시다, app/Http/Controllers/ImageController.php
<?php

namespace App\Http\Controllers;

use App\Models\Image;
use Illuminate\Http\Request;
use Illuminate\Support\Facades\Storage;

class ImageController extends Controller
{
	...

    public function index()
    {
        $lists = $this->image->paginate(10);
        return view('image/index', compact("lists"));
    }

    ...
}이제 view를 추가해줍시다. resources/views/image/index.blade.php
<!DOCTYPE html>
<html>
<head>
    <title>dropzone</title>
    <meta name="_token" content="{{csrf_token()}}"/>
    <script src="https://code.jquery.com/jquery-3.6.0.min.js"
            integrity="sha256-/xUj+3OJU5yExlq6GSYGSHk7tPXikynS7ogEvDej/m4=" crossorigin="anonymous"></script>
    <link href="https://cdn.jsdelivr.net/npm/bootstrap@5.0.2/dist/css/bootstrap.min.css" rel="stylesheet">
</head>
<body>
<div class="container">
    <h4 class="pt-4">Laravel Image Archive</h4>


    <div class="container" class="pt-4">
        <div class="row">
            <div class="col-12">
                <table class="table table-image">
                    <thead>
                    <tr>
                        <th scope="col">No</th>
                        <th scope="col">Name</th>
                        <th scope="col">Image</th>
                        <th scope="col">Created At</th>
                        <th scope="col">
                            <a href="{{route('image.create')}}">
                                <button class="btn btn-primary btn-xs">Create</button>
                            </a>
                        </th>
                    </tr>
                    </thead>
                    <tbody>
                    @php
                         $number = ($lists->currentPage() -1) * $lists->perPage()
                    @endphp
                    @foreach($lists as $key => $list)
                        <tr>
                            <td scope="row">{{$key + 1 + $number }}</td>
                            <td>{{$list->origin_name}}</td>
                            <td class="w-25">
                                <img src="{{asset($list->path)}}" class="img-fluid img-thumbnail"
                                     alt="{{$list->origin_name}}">
                            </td>
                            <td>{{$list->created_at}}</td>
                            <td>
                                {{-- 아직은 삭제 기능을 만들 지 않았으므로 실행되지 않습니다. --}}
                                <form action="#" method="post">
                                    @csrf
                                    @method('delete')
                                    <input type="hidden" name="page" value="{{$lists->currentPage()}}">
                                    <input onclick="return confirm('정말로 삭제하겠습니까?')" type="submit" value="delete"/>
                                </form>
                            </td>
                        </tr>
                    @endforeach
                    </tbody>
                </table>

                {{-- 라라벨 기본 페이지네이션을 사용하도록 합시다. --}}
                {!! $lists->links() !!}
            </div>
        </div>
    </div>
</body>
</html>라라벨의 기본 페이지네이션을 사용하도록 했으니 라라벨 기본 부트스트랩도 적용시키도록 합시다
app/Providers/AppServiceProvider.php
<?php

namespace App\Providers;

use Illuminate\Support\ServiceProvider;
use Illuminate\Pagination\Paginator;

class AppServiceProvider extends ServiceProvider
{
	...

    /**
     * Bootstrap any application services.
     *
     * @return void
     */
    public function boot()
    {
        Paginator::useBootstrapFive();
        Paginator::useBootstrapFour();
    }
}왜 이렇게 하는지 이해가 안 가는 분들은 다음 글을 참고해주세요.
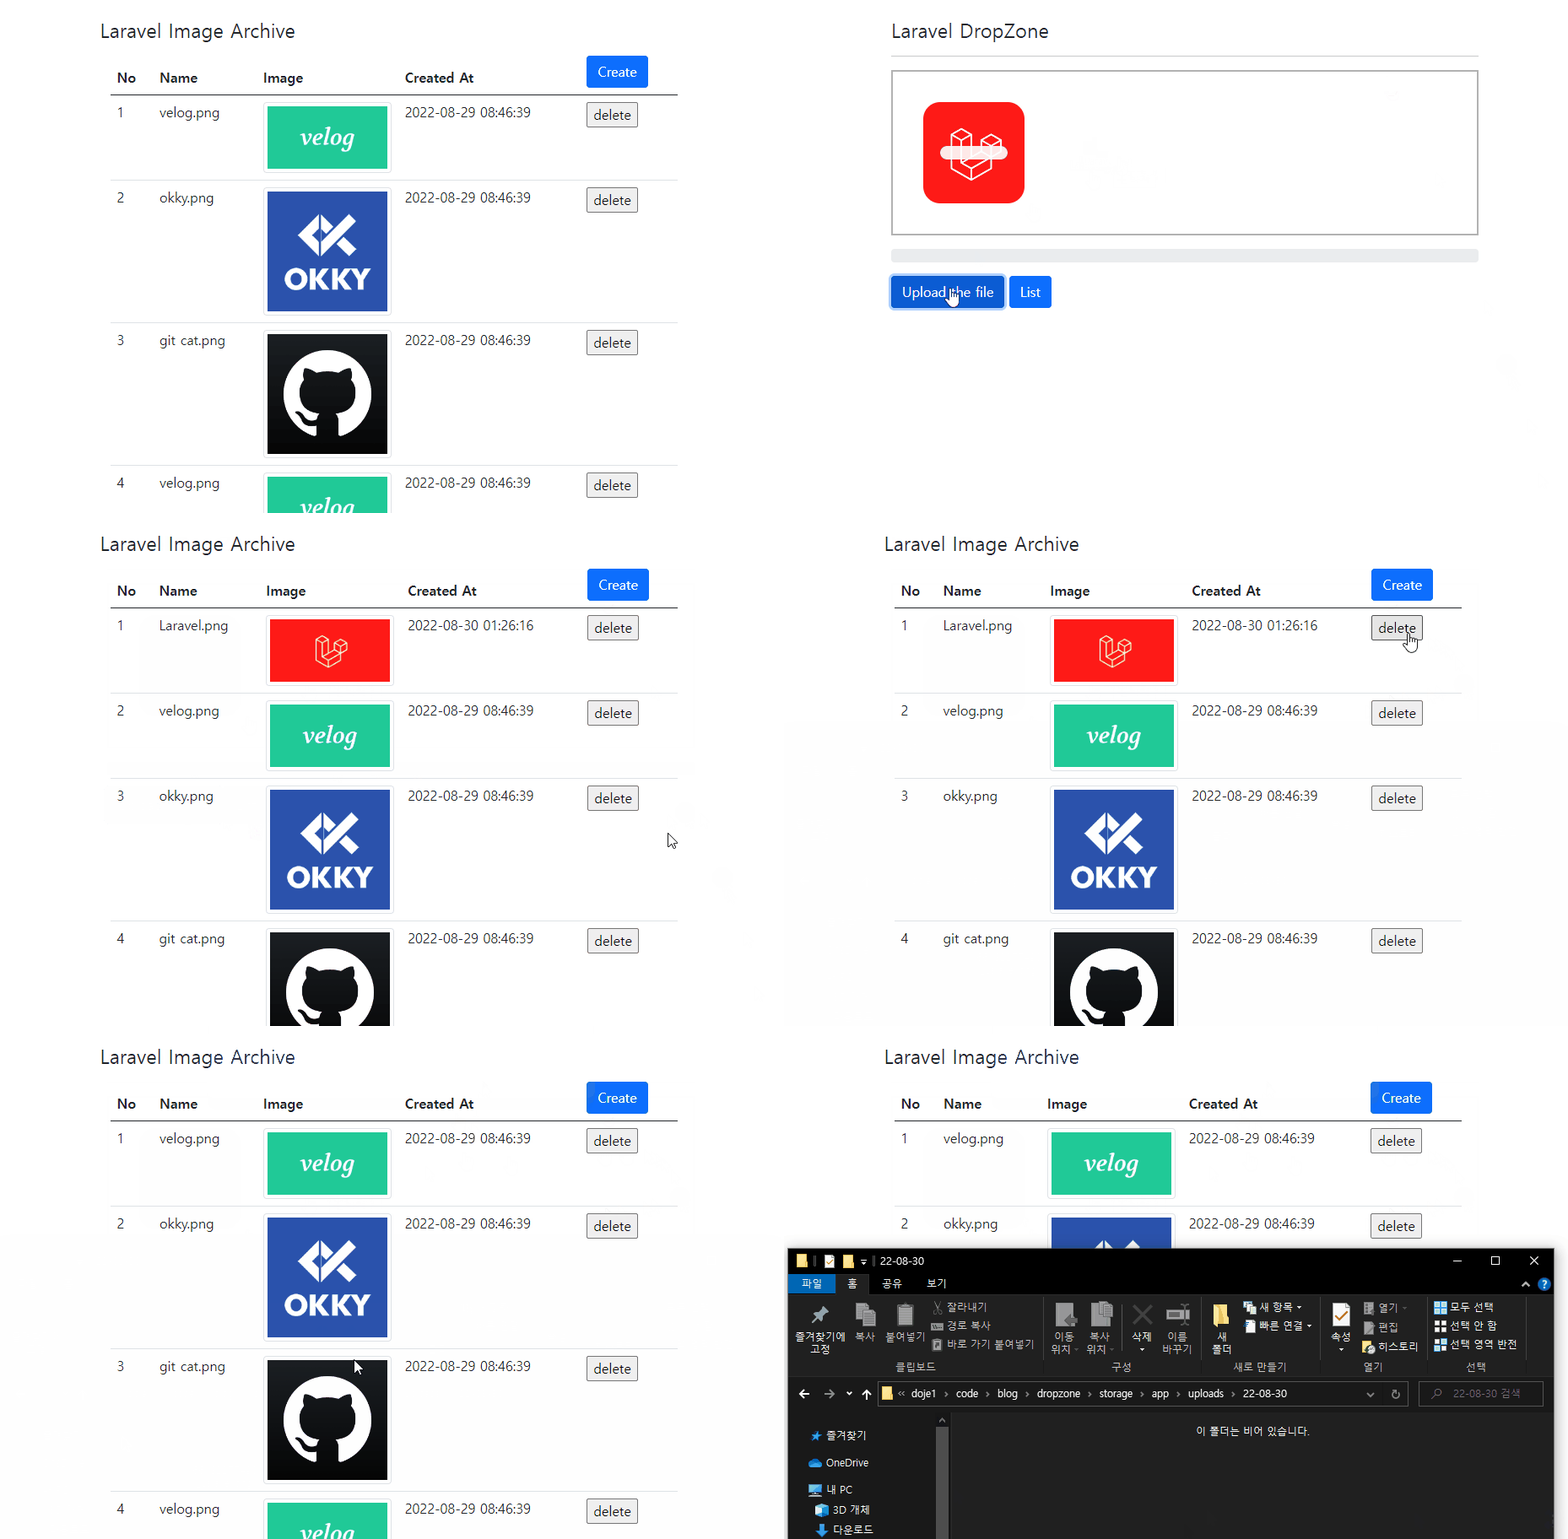
그러면 아래와 같이 적용된 인덱스를 확인이 가능합니다.

그리고 create 페이지에 리스트로 돌아가는 버튼을 추가해줍시다.
resources/views/image/create.blade.php
...

    <h4 class="pt-4">Laravel DropZone</h4>
    <hr class="pd-4"/>
    {{-- 최대 업로드 양을 넘었을 경우 경고를 띄어줍시다. --}}
    <div class="alert alert-danger" role="alert" style="display: none">
        이미지는 한번에 5개까지 업로드가 가능합니다.
    </div>
    <form method="post" action="{{route('image.store')}}" enctype="multipart/form-data" class="dropzone" id="dropzone">
        @csrf
    </form>
    {{-- 프로그래스 바를 만들어줍시다. --}}
    <div class="progress mt-3 mb-3">
        <div class="progress-bar" role="progressbar" aria-valuenow="75" aria-valuemin="0" aria-valuemax="100"></div>
    </div>
    <button type="submit" id="submit-all" class="btn btn-primary btn-xs">Upload the file</button>
    {{-- 아래 부분이 추가된 부분입니다. --}}
    <a href="{{route("image.index")}}">
        <button class="btn btn-primary btn-xs">List</button>
    </a>

...결과적으로 아래와 같이 이미지 추가와 페이지네이션이 작동합니다.

2. Destroy
이제 이미지 리스트에서 이미지를 지우는 기능을 추가해줍시다, web.php
Route::delete('{image}', [ImageController::class, 'destroy'])->name('image.destroy');resources/views/image/index.blade.php의 삭제 버튼 form에 action 값을 수정해줍시다.
<form action="{{route('image.destroy', $list->id)}}" method="post">그리고 Controller도 수정합시다, app/Http/Controllers/ImageController.php
...
    public function destroy(Image $image, Request $request)
    {
        $image->delete();
        // 실제 이미지 삭제
        Storage::delete($image->path);
        return redirect()->route('image.index');
    }
}그전에 정렬 기준을 내림차순으로 바꿔줍시다, app/Http/Controllers/ImageController.php
...
    public function index()
    {
        $lists = $this->image->orderBy('created_at','desc')->paginate(10);
        return view('image/index', compact("lists"));
    }
...이제 아래처럼 리스트에서 이미지를 삭제할 수 있습니다.

이제 마지막 단계입니다.
3. Ajax Destroy
이미지를 등록했을 때 마음에 들지 않을 경우 현재 할 수 있는 방법은 화면을 리로드 하는 방법뿐입니다.
하지만 이미 업로드했다면 리스트에 나가서 일일이 삭제하는 방법밖에 없죠.
그 문제를 해결해봅시다.
우선 web.php에 아래 코드를 추가합시다.
Route::post('/destroy', [ImageController::class, 'ajaxDestroy'])->name('image.ajaxDestroy');그리고 resources/views/image/create.blade.php도 수정해줍시다.
addRemoveLinks를 추가함으로써 이미지 삭제 이벤트를 추가하고 삭제 이벤트를 수정합시다.
        Dropzone.options.dropzone =
            {
                ...
                addRemoveLinks: true, // 삭제 버튼 노출
                renameFile: function (file) {
                    ...
                },
                init: function () {
                    ...
                },
                // 삭제 이벤트 추가
                removedfile: function (file) {
                    let file_name = file.upload.filename;
                    let origin_name = file.name;

                    // 삭제 ajax
                    $.ajax({
                        headers: {
                            'X-CSRF-TOKEN': $('meta[name="_token"]').attr('content')
                        },
                        type: 'POST',
                        url: '{{ route("image.ajaxDestroy") }}',
                        data: {
                            "file_name": file_name,
                            "origin_name": origin_name
                        },
                        success: function (data) {
                            console.log("File has been successfully removed!!");
                        },
                        error: function (e) {
                            console.log(e);
                        }
                    });
                    let fileRef;
                    return (fileRef = file.previewElement) != null ?
                        fileRef.parentNode.removeChild(file.previewElement) : void 0;
                },
                success: function (file, response) {
                    ...
                },
                error: function (file, response) {
                    ...
                }
};저는 이미지를 삭제할 때 ajax 요청으로 Controller에 ajaxDestroy 메서드를 부를 것입니다.
이 메서드 업로드 여부와 관계없이 쉽게 처리하기 할 것입니다.
...
    public function ajaxDestroy(Request $request)
    {
        $image = $this->image->where("path", "like", "%".$request["file_name"])->first();
        /*
         * 업로드 된 데이터라면 여기서 데이터를 가져옵니다.
         * 그것은 이미지가 업로드 되었다는 의미로 이미지도 같이 삭제해줍니다.
         */
        if($image != null){
            Storage::delete($image->path);
            $image->delete();
        }
        return response()->json(['success' => true]);
    }
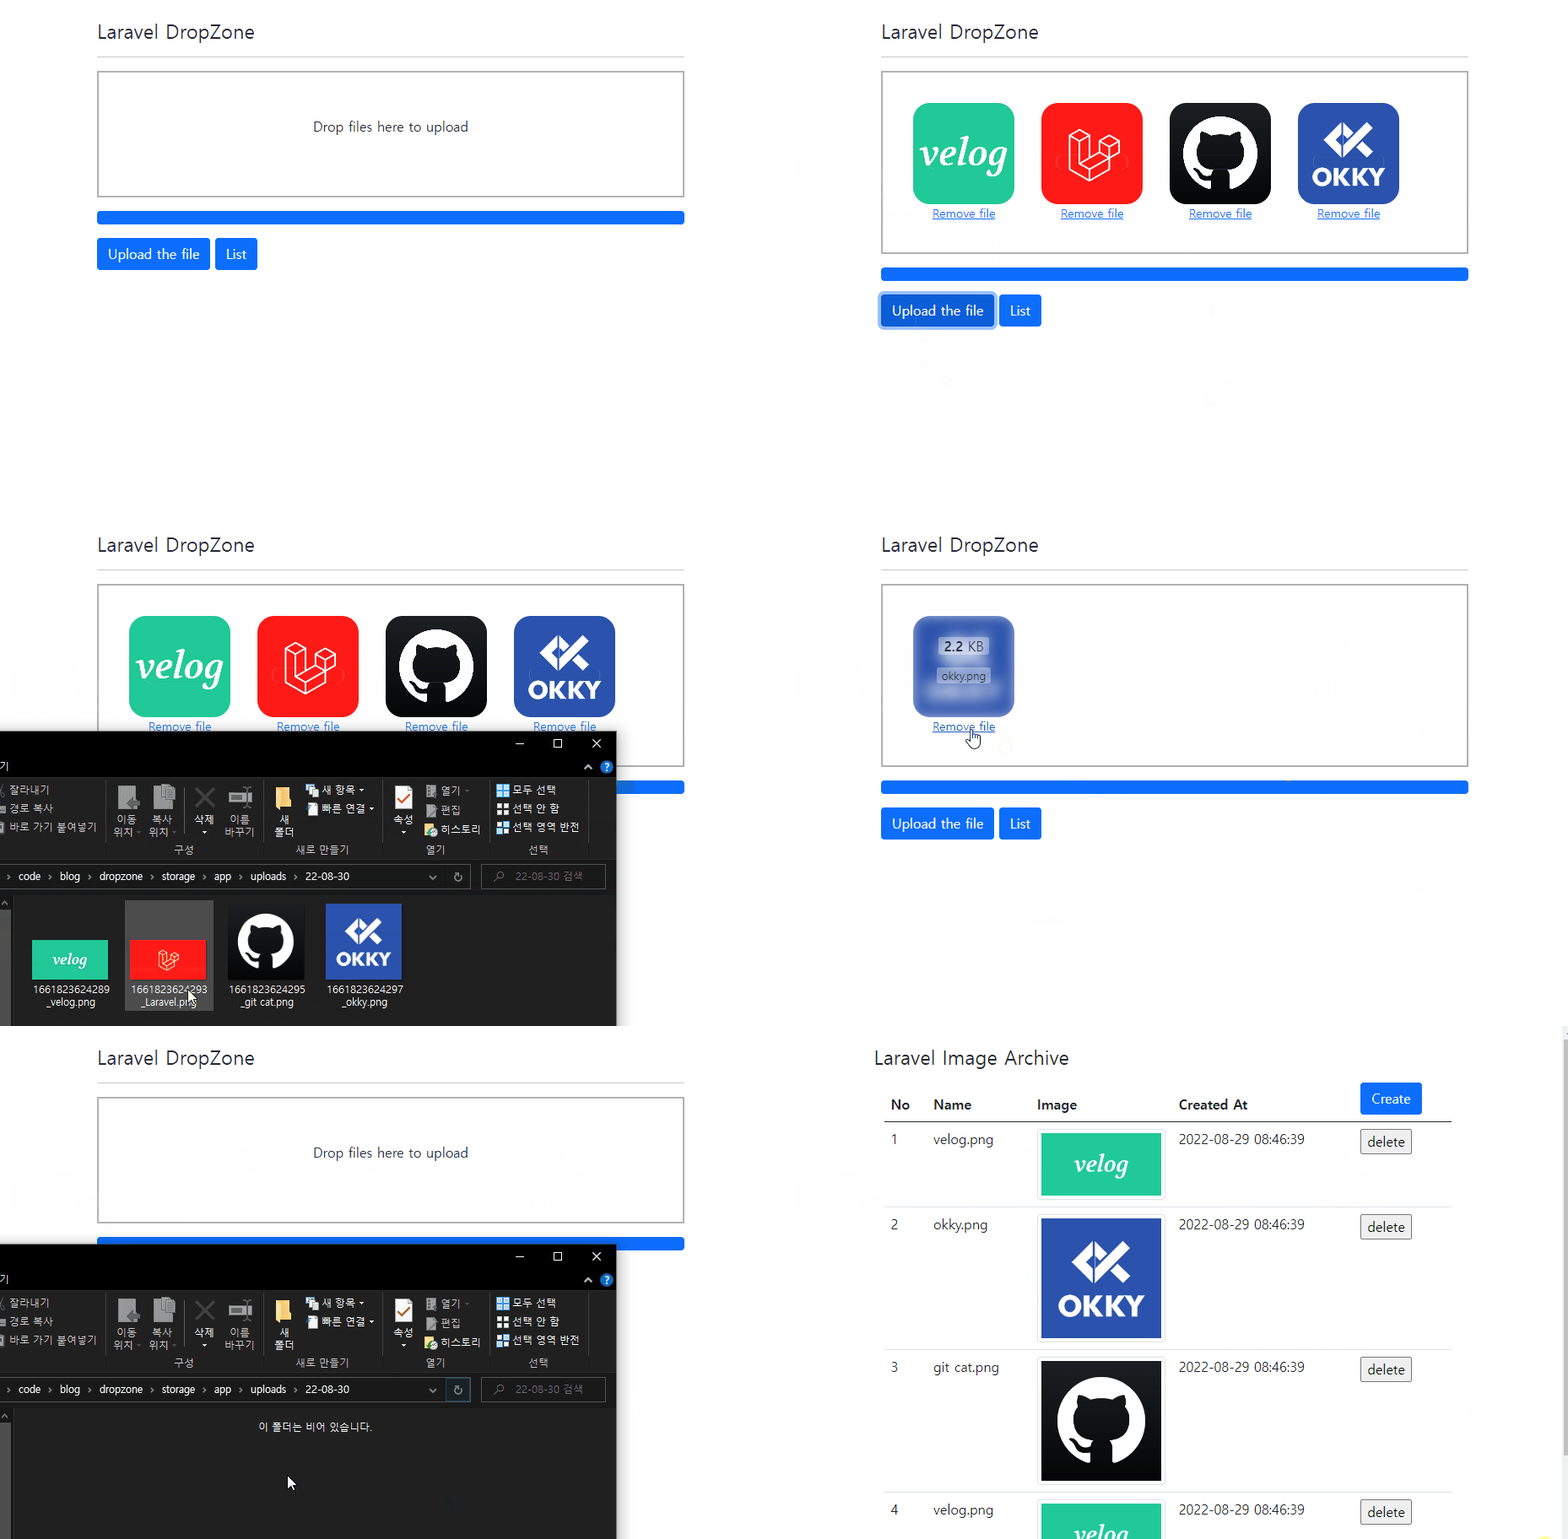
}이제 아래와 같이 이미지 업로드 후에도 create 페이지에서 비동기 삭제가 가능한 것을 볼 수 있습니다.
물론 업로드하지 않은 경우에도 기능을 합니다.

'PHP > Laravel' 카테고리의 다른 글
| Laravel 라라벨 스케줄링(Scheduling)하기 with crontab (0) | 2022.09.15 |
|---|---|
| Laravel9 라라벨 csv 읽어서 저장하기(CSV seeding) (0) | 2022.09.07 |
| Laravel9 이미지 업로드 (with Dropzone) 1부 : Setting & Create & Image Upload (0) | 2022.08.29 |
| Laravel9 라라벨 난수 액셀 다운로드 (Laravel-Excel) (2) | 2022.08.22 |
| Laravel9 라라벨 액셀 다운로드 (Laravel-Excel) (0) | 2022.08.19 |
라라벨 공부
개요
해당 이미지 업로드 포스트는 이전 포스트가 존재합니다, 아래 글부터 봐주시기 바랍니다.
Laravel9 이미지 업로드 (with Dropzone) 1부 : Setting & Create & Image Upload
라라벨 공부 바로가기 개요 우리가 만들 사이트는 Dropzone.js를 이용해 Drag & Drop으로 이미지를 저장할 수 있는 일종의 미디어 라이브러리를 만들고자 합니다, Dropzone.js를 쓰지 않는 이미지 업로드
seung.tistory.com
1. Index
이제 이미지도 저장했고 DB에 데이터도 저장했습니다.
저장한 데이터를 뿌려주도록 합시다
web.php에 아래 코드를 추가해주도록 합시다.
Route::get('/', [ImageController::class, 'index'])->name('image.index');컨트롤러도 수정해줍시다, app/Http/Controllers/ImageController.php
<?php

namespace App\Http\Controllers;

use App\Models\Image;
use Illuminate\Http\Request;
use Illuminate\Support\Facades\Storage;

class ImageController extends Controller
{
	...

    public function index()
    {
        $lists = $this->image->paginate(10);
        return view('image/index', compact("lists"));
    }

    ...
}
이제 view를 추가해줍시다. resources/views/image/index.blade.php
<!DOCTYPE html>
<html>
<head>
    <title>dropzone</title>
    <meta name="_token" content="{{csrf_token()}}"/>
    <script src="https://code.jquery.com/jquery-3.6.0.min.js"
            integrity="sha256-/xUj+3OJU5yExlq6GSYGSHk7tPXikynS7ogEvDej/m4=" crossorigin="anonymous"></script>
    <link href="https://cdn.jsdelivr.net/npm/bootstrap@5.0.2/dist/css/bootstrap.min.css" rel="stylesheet">
</head>
<body>
<div class="container">
    <h4 class="pt-4">Laravel Image Archive</h4>


    <div class="container" class="pt-4">
        <div class="row">
            <div class="col-12">
                <table class="table table-image">
                    <thead>
                    <tr>
                        <th scope="col">No</th>
                        <th scope="col">Name</th>
                        <th scope="col">Image</th>
                        <th scope="col">Created At</th>
                        <th scope="col">
                            <a href="{{route('image.create')}}">
                                <button class="btn btn-primary btn-xs">Create</button>
                            </a>
                        </th>
                    </tr>
                    </thead>
                    <tbody>
                    @php
                         $number = ($lists->currentPage() -1) * $lists->perPage()
                    @endphp
                    @foreach($lists as $key => $list)
                        <tr>
                            <td scope="row">{{$key + 1 + $number }}</td>
                            <td>{{$list->origin_name}}</td>
                            <td class="w-25">
                                <img src="{{asset($list->path)}}" class="img-fluid img-thumbnail"
                                     alt="{{$list->origin_name}}">
                            </td>
                            <td>{{$list->created_at}}</td>
                            <td>
                                {{-- 아직은 삭제 기능을 만들 지 않았으므로 실행되지 않습니다. --}}
                                <form action="#" method="post">
                                    @csrf
                                    @method('delete')
                                    <input type="hidden" name="page" value="{{$lists->currentPage()}}">
                                    <input onclick="return confirm('정말로 삭제하겠습니까?')" type="submit" value="delete"/>
                                </form>
                            </td>
                        </tr>
                    @endforeach
                    </tbody>
                </table>

                {{-- 라라벨 기본 페이지네이션을 사용하도록 합시다. --}}
                {!! $lists->links() !!}
            </div>
        </div>
    </div>
</body>
</html>
라라벨의 기본 페이지네이션을 사용하도록 했으니 라라벨 기본 부트스트랩도 적용시키도록 합시다
app/Providers/AppServiceProvider.php
<?php

namespace App\Providers;

use Illuminate\Support\ServiceProvider;
use Illuminate\Pagination\Paginator;

class AppServiceProvider extends ServiceProvider
{
	...

    /**
     * Bootstrap any application services.
     *
     * @return void
     */
    public function boot()
    {
        Paginator::useBootstrapFive();
        Paginator::useBootstrapFour();
    }
}
왜 이렇게 하는지 이해가 안 가는 분들은 다음 글을 참고해주세요.
그러면 아래와 같이 적용된 인덱스를 확인이 가능합니다.

그리고 create 페이지에 리스트로 돌아가는 버튼을 추가해줍시다.
resources/views/image/create.blade.php
...

    <h4 class="pt-4">Laravel DropZone</h4>
    <hr class="pd-4"/>
    {{-- 최대 업로드 양을 넘었을 경우 경고를 띄어줍시다. --}}
    <div class="alert alert-danger" role="alert" style="display: none">
        이미지는 한번에 5개까지 업로드가 가능합니다.
    </div>
    <form method="post" action="{{route('image.store')}}" enctype="multipart/form-data" class="dropzone" id="dropzone">
        @csrf
    </form>
    {{-- 프로그래스 바를 만들어줍시다. --}}
    <div class="progress mt-3 mb-3">
        <div class="progress-bar" role="progressbar" aria-valuenow="75" aria-valuemin="0" aria-valuemax="100"></div>
    </div>
    <button type="submit" id="submit-all" class="btn btn-primary btn-xs">Upload the file</button>
    {{-- 아래 부분이 추가된 부분입니다. --}}
    <a href="{{route("image.index")}}">
        <button class="btn btn-primary btn-xs">List</button>
    </a>

...
결과적으로 아래와 같이 이미지 추가와 페이지네이션이 작동합니다.

2. Destroy
이제 이미지 리스트에서 이미지를 지우는 기능을 추가해줍시다, web.php
Route::delete('{image}', [ImageController::class, 'destroy'])->name('image.destroy');resources/views/image/index.blade.php의 삭제 버튼 form에 action 값을 수정해줍시다.
<form action="{{route('image.destroy', $list->id)}}" method="post">그리고 Controller도 수정합시다, app/Http/Controllers/ImageController.php
...
    public function destroy(Image $image, Request $request)
    {
        $image->delete();
        // 실제 이미지 삭제
        Storage::delete($image->path);
        return redirect()->route('image.index');
    }
}
그전에 정렬 기준을 내림차순으로 바꿔줍시다, app/Http/Controllers/ImageController.php
...
    public function index()
    {
        $lists = $this->image->orderBy('created_at','desc')->paginate(10);
        return view('image/index', compact("lists"));
    }
...
이제 아래처럼 리스트에서 이미지를 삭제할 수 있습니다.

이제 마지막 단계입니다.
3. Ajax Destroy
이미지를 등록했을 때 마음에 들지 않을 경우 현재 할 수 있는 방법은 화면을 리로드 하는 방법뿐입니다.
하지만 이미 업로드했다면 리스트에 나가서 일일이 삭제하는 방법밖에 없죠.
그 문제를 해결해봅시다.
우선 web.php에 아래 코드를 추가합시다.
Route::post('/destroy', [ImageController::class, 'ajaxDestroy'])->name('image.ajaxDestroy');그리고 resources/views/image/create.blade.php도 수정해줍시다.
addRemoveLinks를 추가함으로써 이미지 삭제 이벤트를 추가하고 삭제 이벤트를 수정합시다.
        Dropzone.options.dropzone =
            {
                ...
                addRemoveLinks: true, // 삭제 버튼 노출
                renameFile: function (file) {
                    ...
                },
                init: function () {
                    ...
                },
                // 삭제 이벤트 추가
                removedfile: function (file) {
                    let file_name = file.upload.filename;
                    let origin_name = file.name;

                    // 삭제 ajax
                    $.ajax({
                        headers: {
                            'X-CSRF-TOKEN': $('meta[name="_token"]').attr('content')
                        },
                        type: 'POST',
                        url: '{{ route("image.ajaxDestroy") }}',
                        data: {
                            "file_name": file_name,
                            "origin_name": origin_name
                        },
                        success: function (data) {
                            console.log("File has been successfully removed!!");
                        },
                        error: function (e) {
                            console.log(e);
                        }
                    });
                    let fileRef;
                    return (fileRef = file.previewElement) != null ?
                        fileRef.parentNode.removeChild(file.previewElement) : void 0;
                },
                success: function (file, response) {
                    ...
                },
                error: function (file, response) {
                    ...
                }
            };
저는 이미지를 삭제할 때 ajax 요청으로 Controller에 ajaxDestroy 메서드를 부를 것입니다.
이 메서드 업로드 여부와 관계없이 쉽게 처리하기 할 것입니다.
...
    public function ajaxDestroy(Request $request)
    {
        $image = $this->image->where("path", "like", "%".$request["file_name"])->first();
        /*
         * 업로드 된 데이터라면 여기서 데이터를 가져옵니다.
         * 그것은 이미지가 업로드 되었다는 의미로 이미지도 같이 삭제해줍니다.
         */
        if($image != null){
            Storage::delete($image->path);
            $image->delete();
        }
        return response()->json(['success' => true]);
    }
 }
이제 아래와 같이 이미지 업로드 후에도 create 페이지에서 비동기 삭제가 가능한 것을 볼 수 있습니다.
물론 업로드하지 않은 경우에도 기능을 합니다.

'PHP > Laravel' 카테고리의 다른 글
| Laravel 라라벨 스케줄링(Scheduling)하기 with crontab (0) | 2022.09.15 |
|---|---|
| Laravel9 라라벨 csv 읽어서 저장하기(CSV seeding) (0) | 2022.09.07 |
| Laravel9 이미지 업로드 (with Dropzone) 1부 : Setting & Create & Image Upload (0) | 2022.08.29 |
| Laravel9 라라벨 난수 액셀 다운로드 (Laravel-Excel) (2) | 2022.08.22 |
| Laravel9 라라벨 액셀 다운로드 (Laravel-Excel) (0) | 2022.08.19 |
